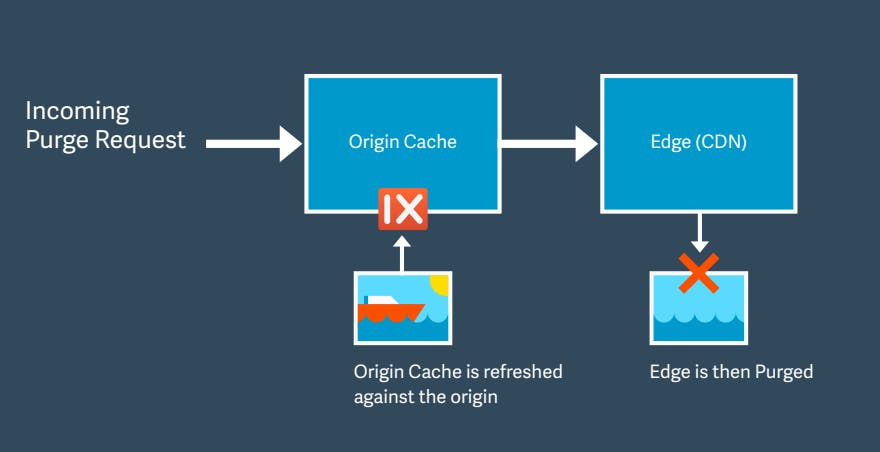
One area where we get a lot of questions is around purging images. Although purging is a familiar concept to anyone who has previously worked with Content Delivery Networks, or indeed any distributed system that needs to sync data between nodes, the concept is not the most intuitive, and every purge system functions differently. New users sometimes have an incomplete understanding of the purge process, and that can lead to confusion when the system performs differently than expected. For that reason, we thought some clarity around how image purges work in imgix would prove helpful
Image purges defined
First off, what is a purge in this context?
Every image served through imgix is cached centrally and at edge nodes throughout our global CDN network. You can read a bit more about that here, but the important thing to understand for our purposes is that a single master image file stored in a Source becomes many derivative image files stored in multiple locations within imgix once the system starts serving it.
Among these is a full-sized image cached in our rendering cluster, called the "Origin Cache," which is used rather than the master image to fulfill all requests after the first. This image is periodically revalidated against the Source so that everything stays in sync and current, subject to a max age parameter set in Cache-Control header for the file. The default max age in Source configuration is one year. Customers can also define their own value on a per-Source or per-image basis.
This caching scheme cuts down on latency, since we don't have to request a new version of the master every time there's a new request. But it also means that changes to the master image stored in the Source aren't immediately applied to derivatives across our system. Rather, these changes will only be applied once the Origin Cache image’s max age is reached and it is re-validated. For faster results, it is necessary to revalidate the image manually by initiating a purge request.
There are two situations where a purge is necessary:
- When you need to change the image in the Source by overwriting it with a new image that has the same file name.
- When you need to completely eliminate an unwanted or out-of-date image that's being served through imgix.
For more information on how to initiate a purge request, see our Purging Images guide. For now, what we're really concerned with is what happens once that request is made.
The steps of a purge
Once a purge request is made, the first thing that happens is that imgix will revalidate the Origin Cache image that is stored in our rendering cluster, verifying that the image in the Source is indeed different from the current Origin Cache. If so, it will replace the image in the Origin Cache.
Having updated the Origin Cache, imgix then deletes every derivative image from the CDN that was made from that master image. Changes proceed through the network from the point farthest from an end user to the point closest: first the Origin Cache, then the CDN shield, then the edge nodes.
Thereafter, requests are fulfilled as if it was the first time that variant was requested, with the rendering cluster applying transformations to the new Origin Cache image, serving and caching the result.
So, to recap, it goes:
- Revalidate
- Update Origin Cache
- Delete derivatives from CDN
- Regenerate derivatives as they are requested from the new Origin Cache
Implications
This system has some important implications that users should keep in mind:
- Purging an image has no effect on the master image file stored in your Source. Any changes you require for this image must be completed before the purge is initiated. If there isn't a change to the master, the purge will not complete because it will stop at the revalidation step.
- Purging doesn't, and can't, affect an end user's browser cache. If you've initiated a purge but the old image still seems to appear when you visit your page, verify that your browser cache has been updated before moving on to more advanced troubleshooting.
- The purge process isn't instantaneous, and there's a chance that the old image will still be served while it's being completed. Time to completion depends on the size of the job and the number of jobs in the queue, but it's usually fairly quick—it should take no longer than about 30 seconds, and the vast majority of purges will complete considerably sooner.
- As noted, purging an image also purges all derivatives of that image. This means special care should be taken when purging images that are being used for compositing, as this can have wider effects than is usually preferable. For example, if an image file that’s being used as a watermark is purged, imgix will purge not only the watermark file but also every image that watermark was applied to.
- Purging an image means that requests for that image will see a slight latency uptick until the cache has regenerated, as imgix must pull from the master and process as though it was a new image.
Conclusion
Purging is a powerful tool and very useful in some situations, but it's also big step that can't be reversed. For best performance, we recommend that it be used sparingly.
A good alternative for updating an image without initiating a purge is to simply upload the new file with a new file name, and then make changes in the front end to point at this new image. This practice is especially useful for images that are being used for compositing, since it limits the amount of derivatives that are touched by the purge.


